"본 포스팅은 제가 직접 작성하는 것이기 때문에, 저의 허가없이 어떤 형태로의 배포도 불가합니다."
강사 계영수
Cisco 에서 만들어진 라우터와 스위치에는 IOS(Internetworking Operating System)이라는 운영체제가 설치되어 있다. 네트워크를 공부한다는 것은 라우터와 스위치가, 엔지니어가 의도하는 대로, 데이터를 전달하도록 설정해야 하는데, 이러한 목적을 달성하기 위해서는 Cisco 장비의 운영체제인 IOS를 매우 잘 숙지해야 한다.
Cisco 창업자

Cisco Logo

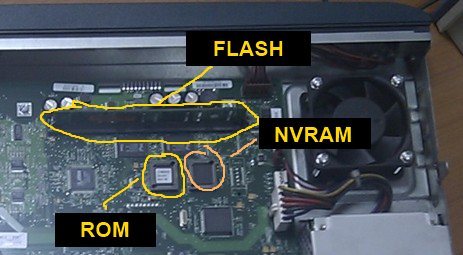
Cisco 장비의 메인보드

IOS의 특징
- Cisco 장비(주로 라우터와 스위치)의 운영체제
- Unix 를 기반으로 하고 있음
- 100% 명령어 기반, 즉 모든 작업을 엔지니어과 관련된 명령어를 콘솔이라는 터미널을 통해서 입력해야 한다.
- 많은 IOS 명령어를 숙지하고 기억하고 있어야 함
- GUI(Graphical User Interface) 환경은 전혀 제공되지 않음
다음 그림과 같이 2811 라우터를 한대 준비한다.
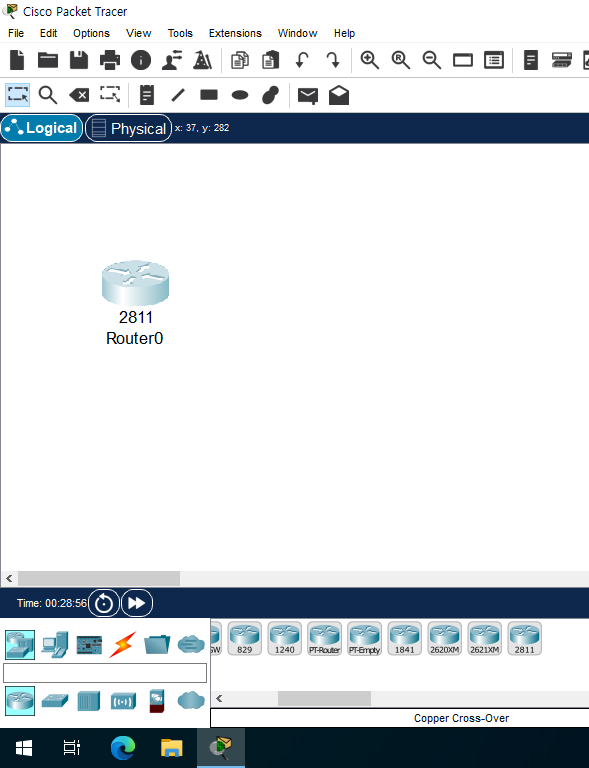
장비의 설정을 시작하기
- 라우터 그림을 클릭하면 창이 나온다.
- 4개의 탭- Physical, Config, CLI, Attributes- 이 있는데, CLI 탭을 선택한다.
- CLI 탭을 클릭하면 나오는 것을 콘솔 화면이라고 부른다.
System Bootstrap, Version 12.1(3r)T2, RELEASE SOFTWARE (fc1)
Copyright (c) 2000 by cisco Systems, Inc.
cisco 2811 (MPC860) processor (revision 0x200) with 60416K/5120K bytes of memory

Readonly ROMMON initialized

program load complete, entry point: 0x8000f000, size: 0xc940
program load complete, entry point: 0x8000f000, size: 0xc940

program load complete, entry point: 0x8000f000, size: 0x3ed1338
Self decompressing the image :
########################################################################## [OK]
Smart Init is enabled
smart init is sizing iomem
ID              TYPE       MEMORY_REQ
0003E7          0X00474800 C2811 Mainboard
~~~~~  생략
~~~~~  생략
~~~~   생략
~~~~   생략
cisco 2811 (MPC860) processor (revision 0x200) with 60416K/5120K bytes of memory
Processor board ID JAD05190MTZ (4292891495)
2 FastEthernet interface(s)
DRAM configuration is 64 bits wide with parity disabled.
255K bytes of non-volatile configuration memory.
249856K bytes of ATA System CompactFlash 0 (Read/Write)


         --- System Configuration Dialog ---

Would you like to enter the initial configuration dialog? [yes/no]: no


Press RETURN to get started!


Router>
장비를 처음 부팅하면 [yes/no] 를 묻는 경우가 있는데, 이때는 무조건 no라고 입력하고 진행한다
         --- System Configuration Dialog ---

Would you like to enter the initial configuration dialog? [yes/no]: no


Press RETURN to get started!
Cisco IOS Mode 익히기

Cisco IOS를 익힐때 제일 먼저 이해하여야 하는 것은 IOS가 가지는 모드 개념이다. Cisco IOS 명령어는, 그 명령어에 적합한 모드에서만 오류없이 실행이 가능하다. 맞지 않는 모드에서 명령어를 입력하면 오류가 발생한다.
▶ User Mode
일단 장비의 콘솔로 진입하면 User Mode에서 시작한다. 아래와 같이 "Router>"의 프롬프트가 주어진다. User Mode에서는 장비의 설정을 변경할 수 있는 명령어는 입력이 불가하다. User Mode는 장비의 기본적인 상태만 확인할 수 있는 수준의 명령어 입력만 가능하다.
Router>
▶ Priviledged Mode
User Mode에서 'enable' 이라는 명령어를 입력하면 Priviledged Mode 로 진입한다. Priviledged Mode에서부터는 장비의 설정을 변경할 수 있는 명령어 입력이 가능하고, 다른 모드로 이동이 가능하다. 실무적으로는 User Mode에서 Priviledged Mode로 진입시 패스워드 인증을 걸게 된다.
Priviledged Mode에서 다시 User Mode로 돌아가려면 disable 이라고 입력한다.
Router>
Router>enable
Router#disable
Router>
Priviledged Mode는 장비의 설정을 제한없이 확인하기 위한 모드이다. 장비의 동작에 영향을 주는 명령어를 입력하기 위해서는 우선 Global Mode로 진입한다. Global Mode로 진입하기 위해서는 Configure Terminal이라고 입력한다. Global Mode의 프롬프트는 "Router(config)#"이다. Global Mode에서 다시 Priviledged Mode로 돌아가기 위해서는 'exit'라고 입력한다.
Router>enable
Router#configure terminal
Enter configuration commands, one per line.  End with CNTL/Z.
Router(config)#exit
Router#
%SYS-5-CONFIG_I: Configured from console by console
Cisco IOS에는 셀수 없이 많은 명령어와, 명령어에 따른 옵션들이 있기 때문에 명령어를 모두 기억하기란 불가능하다. 따라서 명령어를 정확히 몰라도 IOS 명령어를 사용할 수 있도록 도와주는 IOS Context Help 기능이 있다.
다음 실습은 Priviledged Mode에서 한다.
장비의 현재 시간을 확인하려면 어떤 명령어가 있을까? 일단 ? 입력하자. 어떤 명령어를 입력할지 모를때는 ?(물음표)를 입력한다. 참고로 패킷트레이서에서 나오는 명령어나 옵션들은 실제 장비보다 많이 적다.
Router#?
Exec commands:
  <1-99>      Session number to resume
  auto        Exec level Automation
  clear       Reset functions
  clock       Manage the system clock
  configure   Enter configuration mode
  connect     Open a terminal connection
  copy        Copy from one file to another
  debug       Debugging functions (see also 'undebug')
  delete      Delete a file
  dir         List files on a filesystem
  disable     Turn off privileged commands
  disconnect  Disconnect an existing network connection
  enable      Turn on privileged commands
  erase       Erase a filesystem
  exit        Exit from the EXEC
  logout      Exit from the EXEC
  mkdir       Create new directory
  more        Display the contents of a file
  no          Disable debugging informations
  ping        Send echo messages
  reload      Halt and perform a cold restart
  resume      Resume an active network connection
  rmdir       Remove existing directory
  send        Send a message to other tty lines
  setup       Run the SETUP command facility
  show        Show running system information
  ssh         Open a secure shell client connection
  telnet      Open a telnet connection
  terminal    Set terminal line parameters
  traceroute  Trace route to destination
  undebug     Disable debugging functions (see also 'debug')
  vlan        Configure VLAN parameters
  write       Write running configuration to memory, network, or terminal
Router#
자, 어떤 명령어를 사용하면 장비의 현재 시간을 확인할 수 있을까? 일단 show로 시작하는 명령어를 확인하여 보자. show 로 시작하는 명령어가 무엇이 있는지 show 다음에 ? 를 입력한다.
Router#show ?
  aaa                Show AAA values
  access-lists       List access lists
  arp                Arp table
  cdp                CDP information
  class-map          Show QoS Class Map
  clock              Display the system clock
  controllers        Interface controllers status
  crypto             Encryption module
  debugging          State of each debugging option
  dhcp               Dynamic Host Configuration Protocol status
  dot11              IEEE 802.11 show information
  ephone             Show all or one ephone status
  file               Show filesystem information
  flash:             display information about flash: file system
  flow               Flow information
  frame-relay        Frame-Relay information
  history            Display the session command history
  hosts              IP domain-name, lookup style, nameservers, and host table
  interfaces         Interface status and configuration
  ip                 IP information
  ipv6               IPv6 information
  license            Show license information
  line               TTY line information
  lldp               LLDP information
  logging            Show the contents of logging buffers
  login              Display Secure Login Configurations and State
  mac-address-table  MAC forwarding table
  ntp                Network time protocol
  parser             Show parser commands
  policy-map         Show QoS Policy Map
  pppoe              PPPoE information
  privilege          Show current privilege level
  processes          Active process statistics
  protocols          Active network routing protocols
  queue              Show queue contents
  queueing           Show queueing configuration
  running-config     Current operating configuration
  secure             Show secure image and configuration archive
  sessions           Information about Telnet connections
  snmp               snmp statistics
  spanning-tree      Spanning tree topology
  ssh                Status of SSH server connections
  standby            standby configuration
  startup-config     Contents of startup configuration
  storm-control      Show storm control configuration
  tcp                Status of TCP connections
  tech-support       Show system information for Tech-Support
  terminal           Display terminal configuration parameters
  users              Display information about terminal lines
  version            System hardware and software status
  vlan-switch        VTP VLAN status
  vtp                Configure VLAN database
  zone               Zone Information
  zone-pair          Zone pair information
Router#show
"show clock"이라는 명령어가 아마도 장비의 현재 시간을 보여줄 것 같다.
Router#show clock
*0:8:54.699 UTC Mon Mar 1 1993
Router#
이번에는 장비의 현재 시간을 설정하자. 앞서서 Priviledged Mode에서 ? 를 입력하였을때 clock 이라는 명령어가 시간을 설정할 수 있는듯 하였다.
Router#?
Exec commands:
  <1-99>      Session number to resume
  auto        Exec level Automation
  clear       Reset functions
  clock       Manage the system clock
  configure   Enter configuration mode
  connect     Open a terminal connection
  copy        Copy from one file to another
  debug       Debugging functions (see also 'undebug')
  delete      Delete a file
  ~~~~
clock 이라고 입력하자.
Router#clock
% Incomplete command.
Router#clock ?
  set  Set the time and date
Router#clock
clock 이라고 입력하였더니 옵션이 부족하다. clock 다음에 ?를 입력하여 어떤 옵션이 있는지 확인한다. 이러한 방식으로 필요한 옵션을 확인하여 시간을 설정하는 명령어를 완성하여 보자.
Router#
Router#clock
% Incomplete command.
Router#clock ?
  set  Set the time and date
Router#clock ?
  set  Set the time and date
Router#clock set ?
  hh:mm:ss  Current Time
Router#clock set 12:34:56 ?
  <1-31>  Day of the month
  MONTH   Month of the year
Router#clock set 12:34:56 1 Jan ?
  <1993-2035>  Year
Router#clock set 12:34:56 1 Jan 2024 ?
  <cr>
Router#clock set 12:34:56 1 Jan 2024
Router#
시간이 변경되었는지 확인하자.
Router#show clock
12:35:21.316 UTC Mon Jan 1 2024
Router#
현재 작업 내역 확인하기
Switch#show running-config
Building configuration...

Current configuration : 1284 bytes
!
version 15.0
no service timestamps log datetime msec
no service timestamps debug datetime msec
no service password-encryption
!
hostname Switch
!
spanning-tree mode pvst
spanning-tree extend system-id
!
interface FastEthernet0/1
 switchport access vlan 10
 switchport mode access
!
interface FastEthernet0/2
 switchport access vlan 20
 switchport mode access
!
interface FastEthernet0/3
 switchport access vlan 10
 switchport mode access
!
interface FastEthernet0/4
 switchport access vlan 20
 switchport mode access
!
interface FastEthernet0/5
!
~~~~ 생략 ~~~~
interface GigabitEthernet0/1
!
interface GigabitEthernet0/2
!
interface Vlan1
 no ip address
 shutdown
!
!
line con 0
!
line vty 0 4
 login
line vty 5 15
 login
!
end


Switch#
작업 내역 저장하기 (장비가 꺼졌다 켜저도 설정 정보가 남아 있음)
Switch#copy running-config startup-config
Destination filename [startup-config]?
Building configuration...
[OK]
Switch#
설정의 저장

copy run start 라는 명령어는 RAM에 현재 저장되어 있는 장비의 설정을 비휘발성 메모리인 NVRAM으로 복사하는 과정이다.
'ETC > 실습 핵심 네트워크' 카테고리의 다른 글
| 패킷트레이서로 실습 네트워크 구성하기 (0) | 2024.01.28 |
|---|---|
| Cisco Console 연결의 이해 (0) | 2024.01.27 |
| 기본 토폴로지 구성 실습(01) (0) | 2023.08.08 |
| 패킷트레이서 설치 (0) | 2023.08.08 |
| 패킷 트레이서의 다운로드 (0) | 2023.08.08 |


